
Page mise à jour le :
22/07/2008

Francais
English
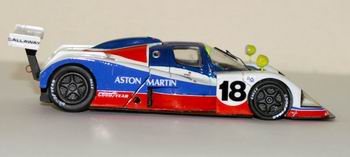
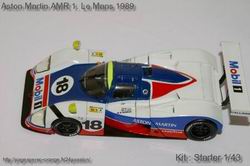
Aston Martin revient en endurance en 1989 avec l'AMR1. La voiture est d'aspect pataud et est handicapée par un poids trop élevé ainsi qu'une trainée trop pénalisante. Mais le V8 de 6 litres développant 650CV a un bruit envoutant capable de faire trembler les tribunes. Sur les deux voitures engagées, une seule touchera au but à une encourageante 11eme place. Hélas Aston fait partie du groupe Ford qui ne souhaite pas renouveller l'expérience et ne poursuit pas le dévelloppement de la voiture l'année suivante.
Aston Martin come back again in endurance in 1989 with the AMR 1. The car looks (and is) quite heavy and is handicaped by a too high drag. But the 6 litres V8 engine is good for 650 Hp and makes the grandstands vibrate. Two cars were entered but only one could finish at a good 11th place overall. Unfortunately, Aston Martin is owned by FORD and the American company stops the effort at the end of the year despite the significants improvements of the car.
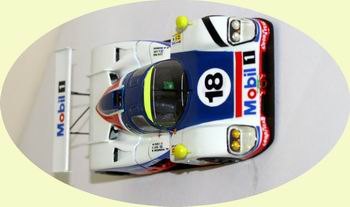
Le Kit Starter a un capot arrière amovible avec un compartiment moteur assez bien représenté.
L'inconvénient étant l'obligation d'un ébavurage encore plus méticuleux que d'habitude. Il est aussi impératif
de vérifier que le capot s'ajuste bien sur le chassis, avant de peindre évidemment.
Théoriquement, rien de bien difficile pour la décoration de la carrosserie mais j'ai voulu me la péter grave en me compliquant la vie
et... J'aurais pas du ! En effet le bleu est fourni sous forme de decalques et je ne voulais pas m'embêter avec des decalques
sur une partie aussi tortueuse que le cockpit. J'ai donc tenté de peindre. Rien de bien compliqué, sauf que j'ai pas réussi a
faire un bleu identique à celui des flancs. Ceci dit, si mon bleu est un peu foncé celui des decalques est un rien trop clair par rapport
au modèle original. Mais bon, la différence ne saute pas aux yeux quand on regarde le kit.
The Kit Starter has a removable back hood with a quite well represented engine compartment. The inconvenience being the obligation
of a deburring even more accurate than usually. It is also imperative to verify that the hood fits well on the chassis, before painting of course.
The decoration of the body should have been easy but... I didn't want to use the blue decals provided for the top of the cockpit and the nose. I thought it would be hard to
place a big decal on such surface. So, i've painted it. Right but i did not find a good mix of paint to have the same blue than the side decals. Well, there is a little
difference when you look at the model but that is all right.
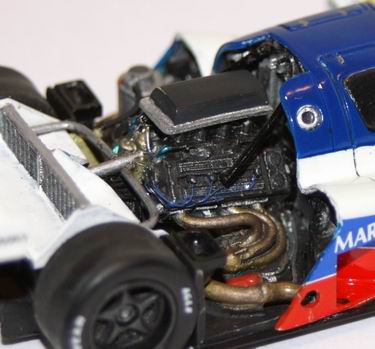
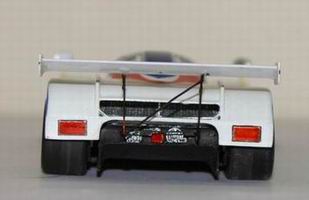
Le compartiment moteur demande pas mal de travail, mais celui ci est assez simple a faire.
Il faut d'abord bien ébavurer tous les surplus de résine qui se sont insinués autour des radiateurs et des
échappements en faisant attention a ne pas enlever des morceaux "utiles". Ensuite, une partie du compartiment est moulé
avec la carrosserie, l'autre avec le chassis, il faut faire attention aux raccords. Enfin, la notice étant simpliste, il est impératif de se
procurer d'autres photos du compartiment. Pour ma part, je me suis servi de l'annuel 1989 des 24 HEURES DU MANS et de toute une
série de clichés glanés sur la toile.
L'ensemble des cloisons et du moteur est d'abord peint à l'aérographe en noir mat puis chaque partie est
repiquée au pinceau. Bas moteur en Alu, culasses en noir métal puis brossé en alu pour faire
ressortir les détails... etc. Le tout en s'inspirant des photos de l'engin réel. Quelques tuyaux et raccords bien
visibles sont réalisé avac des gaines de fils téléphoniques et la partie finale des
échappements, manquante, est fait avec une gaine de fil de section un peu plus grosse. L'ensemble reçoit
un léger jus noir pour bien visualiser les reliefs.
The engine bay needs a quite big job, but that is easy to do. First i have removed all the residual
mould resin parts, all around the side coolers and the lower part of the engine, taking care to not damage the
"good" parts of the model. A part of the engine bay is moulded on the body and the other on the chassis, i had to
be carefull for the junction of the two parts. Don't forget to find many pictures of the engine bay, because the notice
is not clear enough. I used the 24 HEURES DU MANS 1989 book and other pics i've found on the web to help me.
The engine bay is first sprayed in matt black then each part is painted with a brush reffering to the pics for the colors :
low engine in aluminium, upper engine in metallic black (with an aluminium drybrush), spark plug cables in blue... Some
missing pipes are made with phone wires and the end of the exhaust pipes (also missing in my model) is made with a bigger wire.
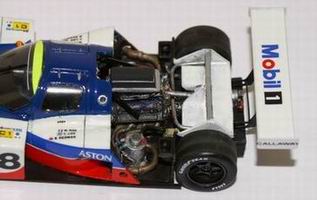
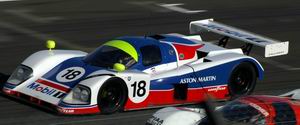
Le reste du montage est assez simple. Oon peu maintenant faire une petite comparaison avec le modèle original, photographié ici lors des essais Group C au Mans 2008.
Finishing the model is easy then. Now we could compare it with the original car seen during the practices of the Group C race in LE MANS 2008.
Les photos de ce site sont des clichés personnels et ne sont pas libres de droit
All the pictures of this site are personals ones and are not free of use